Have you set up your giving page to accept ACH payments as a giving option yet? If you’re not sure about going this route, let’s talk about why you should at least consider accepting ACH payments.
Not so long ago, checks dominated the giving landscape.
But today, paper checks are becoming less popular across all industries, including nonprofits.
Of course, I don’t think you should jump on the ACH bandwagon just because everyone else is doing it.
But there are some incredible benefits to turning on the receive ACH payment option on your giving pages.
Below, I’ll show you how easy this process is with a RaiseDonors giving page…
But first, let’s go through some of the reasons you should at least consider this giving payment method.
ACH Payments cut down hours of work.
Remember some years ago when accounts receivable spent hours opening envelopes, processing checks, posting transactions manually, calling donors when they couldn’t read the checks, asking donors to write a new check because they forgot to sign it, and then making a trip to the bank to deposit all of them?
Those were the days, right?
Well, not so much.
It’s always great to receive lots of gifts in the mail, but then, lots of those gifts went into paying for the hours needed to process them.
ACH payments cut down on hours of repetitive check processing tasks by making the transaction automatic and streamlined.
Once donors enter their bank account information into your secure form, the transaction is processed by the Automated Clearing House, a digital banking network.
The electronic funds are transferred directly from the donors’ bank account to your institution’s account without any middle man or nonprofit receivables staff.
This means there are fewer mistakes. Once the gift is processed, it’s now in your bank account!
ACH Payments make recurring giving easy.
Like credit and debit cards, ACH payments can be made to occur every month, quarter, year, or other frequencies.
So how could ACH recurring payments be even easier than debit and credit card recurring giving?
Because you never have to worry about the donor’s card expiring!
Donors rarely change banks or accounts.
But cards expire every two years or so, and donors have been known to cancel their cards, lose them, or simply order new ones – all which will interrupt your recurring gifts.
Recurring giving is an incredible way to raise loyal donors for your nonprofit and establish a predictable stream of income.
ACH recurring payments make your recurring giving all the more stable.
ACH Payments cost less than other payment forms.
Card processing fees vary from card to card and across payment gateways.
ACH payments tend to be much less costly at about $1.50 per transaction, no matter how large the gift amount might be.
This stagnant payment term may become all the more important to your nonprofit as online giving in general becomes more popular.
Online gifts are getting larger each year as donors feel safe about giving through this channel.
If this trend continues and you’re paying on a percentage basis, you can expect processing costs to increase over time.
But if you can get more of your donors to use the ACH payment option, you’ll be able to avoid these growing costs.
Set Up the ACH Payment on Your RaiseDonors Giving Page
RaiseDonors can empower your nonprofit to implement ACH donation options with our new integration with Plaid via Stripe.
If you’re using a Stripe gateway and accepting gifts in US currency, Raise Donors can now provide the Plaid implementation for you.
So how do I set up ACH payment giving with RaiseDonors?
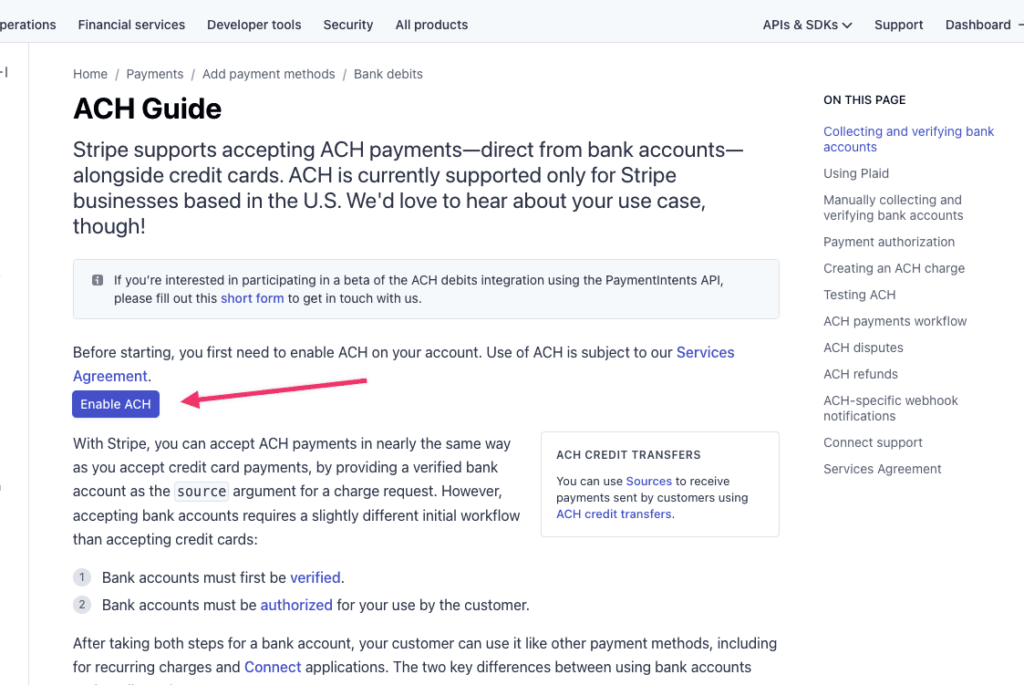
1. Configure your Stripe account to accept ACH payments.
To ensure that you’ve accepted Stripe’s service agreement for ACH payments log in to your Stripe account and go to https://stripe.com/docs/ach.
You will see a button to “enable ACH.”All you need to do is click the button!
If you don’t see this button, you have likely already accepted Stripe’s service agreement.

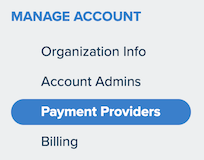
2. Configure your Stripe gateway in RaiseDonors.
After logging in to your RaiseDonors account, click the Settings icon in the upper right and select “Manage Account.” Then, on the settings screen, select “Payment Providers” from the navigation menu on the left.
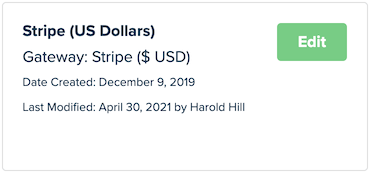
There, you’ll see a list of all active gateways for your account. Look for your Stripe gateway and then click “Edit.”
On the edit screen, scroll to the bottom and look for the “ACH payments” section. On the right, toggle the switch to “ON.”
Easy!
3. Enable ACH on your donation page.
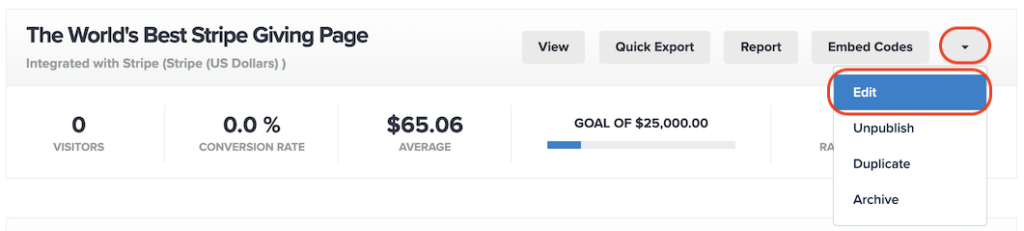
Select “Pages” from the menu at the top of the screen. There, you’ll see all of your existing donation pages. If you’d like to create a new donation page, click on the “New Page” button in the upper right.

To add the ACH option to an existing page, find that page, click on the menu to the right of the page name, and then select “Edit.”
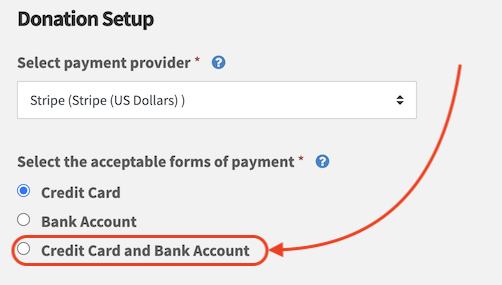
Whether you are creating a new page or editing an existing one, you’ll add the ACH option from the Setup step, which is the second page of the process. There, scroll down to the “Donation Setup” section. Make sure Stripe is selected as the payment provider. Below that, you’ll see radio buttons to select forms of payment. Select the “Credit Card and Bank Account” option to offer both. If desired, you also have the option to offer only bank account payments.
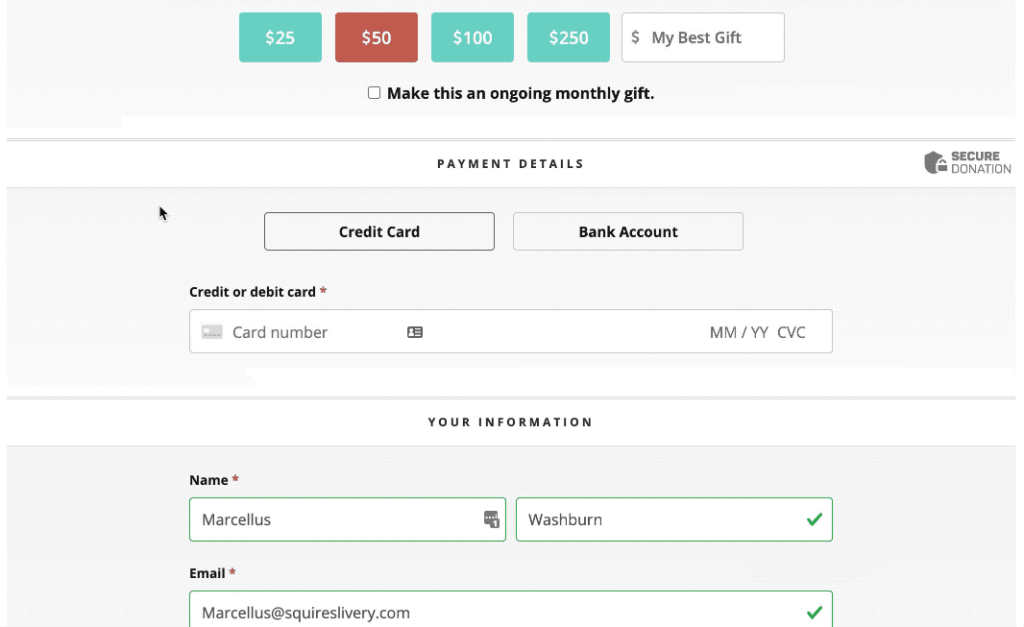
Click “Save” in the upper right to save your changes. Now, when a donor visits your donation page, they will be able to choose the “Bank Account” option, and then they can select their bank and login to their online banking account.
If you have any more questions about adding an ACH payment option on your landing pages, submit a request.
We’d love to help you!